Pullover From Dreams. Пуловер из снов
- Aistė

- Jul 29, 2020
- 10 min read
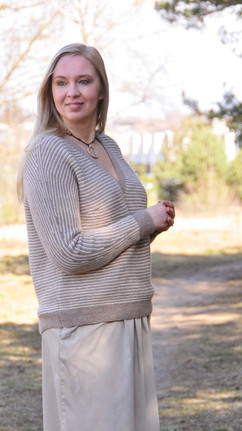
I propose you knit a pullover, the image of which I dreamed. Is it possible to pull a material object out of dreams? It turns out, yes, it is somehow possible. Here, the technique of symmetrical short rows in stripes is used, painting a delicate graphic pattern, and the simple striped Garter Stitch becomes playful. The anatomical dolman sleeve, shoulder darts, bust darts, and a wider front piece at the bust level improves the fit. Both vivid and moderate contrast can be equally successful here – your mood could depend on this. Whether you want to cheer up and express yourself, or to feel melancholy and mysterious, depends on you. You can find a Dream pullover pattern in the shop.
***
Предлагаю Вам связать пуловер, образ которого мне приснился. Возможно ли вытащить материальный предмет из снов? Оказывается, да, возможно. Здесь использована техника симметричных укороченных рядов, рисующих тонкий графический рисунок, и обычная полосатая платочная вязка становится игривой. Анатомическая «летучая мышь», плечевые вытачки, вытачки для груди и более широкая передняя деталь на уровне груди корректируют посадку. Как яркий, так и умеренный контраст здесь может быть одинаково удачным – от этого зависит будущее настроение. Захотите ли вы взбодриться и заявить о себе, или же ощутить себя задумчивой и загадочной, зависит только от Вас. Описание пуловера Dream вы найдете в магазине описаний.

I would rather be having dreams of new designs more often. Of course, I often see knitting in my dreams, but I rarely manage to grab a clear idea. This time I had a precise vision. Symmetrical short rows running along the sleeve and shoulder, white and dark blue stripes, a boatneck, also shaped with short rows and finished with a standing crew neck. I carried this vision in my memory for probably a year, until I was ready to knit it.
It's a pity, but the Dreammaker is not at all familiar with anatomical knitting. Apparently, I should write and think about this even more, so that these principles settle in my brain at the subconscious level. When I started working on the pattern, it turned out to be not so straightforward. First, symmetrical short rows are quite complicated. It turned out to be an impossible task to shape both shoulder slopes and both sides of the boatneck at the same time. Second, in a dream, short rows along the sleeve and shoulder followed the same steps, which turned out to be impossible in the shape of an anatomical dolman sleeve. If you want to have fewer folds and wrinkles in this type of style, you need to insert a particular dart or wedge between the sleeve and armhole (in other words, a triangular sleeve cap), which changes the angle of the sleeve (see the picture below). From it up, the step of short rows turns changes drastically. Further, the shoulder slope requires its individual rhythm of steps. So it turns out that while we are knitting the upper part, we change the step of short rows turns as many as three times. Dreammaker, I hope you've mastered this lesson.
I also changed the shape of the neck. I realized that I simply would not master the boatneck (the pattern would turn out way more complicated than it should), and I also received a reminder from somebody that the V-neck in my designs is a rare guest. Now I do not regret it; the V-neck fits here perfectly.
***
Я бы хотела, чтобы сны с новыми дизайнами приходили чаще. Я, конечно, часто во снах вижу вязание, но ухватиться за четкую идею удается нечасто. Пуловер Dream во сне увидела очень четко. Симметричные укороченные ряды, идущие вдоль рукава и плеча, белые и темно-синие полосочки, горловина-лодочка, также сформирована укороченными рядами в конце обработана стойкой. Это видение носила в памяти, наверное, год, пока не собралась его связать.
Жаль, но Создатель снов совсем не знаком с анатомическим вязанием. Видимо, придется еще больше об этом писать и думать, чтобы эти принципы засели в моем мозгу на уровне подсознания. Когда начала работать над выкройкой, все оказалось не так просто. Первое, симметричные укороченные ряды – штука достаточно сложная, и одновременно выполнить оба скоса плеч и сформировать углубление для горловины-лодочки оказалось невыполнимой задачей. Второе – во сне шаг укороченных рядов по рукаву и плечу шел одинаковыми шагами, что оказалось невозможным в форме анатомической "летучей мыши". Для того, чтобы в этом фасоне было меньше заломов, вставляется такая своеобразная вытачка-клин (другими словами, "окат" рукава), меняющий угол наклона рукава (см. фото ниже). От него вверх шаг поворотов укороченных рядов резко меняется. Далее скос плеча требует своего индивидуального ритма. Вот и получается, что во время вязания верхней части мы меняем шаг поворотов укороченных рядов аж три раза. Создатель снов, надеюсь, ты освоил этот урок.
Также поменяла форму горловины. Я поняла, что лодочку я просто не осилю (описание будет слишком сложным), и еще получила от вас напоминание, что V-образная горловина в моих дизайнах – редкий гость. Теперь об этом ни чуть не жалею, V-горловина вписалась тут как нельзя лучше.

Knitting was tough. While I calibrated the upper back, I had to re-knit it four times. For the first time, the “sleeve cap” was divided into two rays. When I got to the short rows, I realized that the rhythm of the turns would have to be changed, not three, but four times. The more different steps there are, the more clarity of the graphics is lost, and everything turns into a kind of a mess. Unraveled.
The second attempt gave me a lesson in color theory and graphics. If the April coat and the Milky Way top, which use the same symmetrical short rows technique in a striped Garter Stitch pattern, I made right by accident, at random, then I got caught here. I started the short rows with the wrong yarn color and knitted the alignment row with a light color yarn. The expected graphical effect did not happen. Now I have learned for life that in this technique, the main yarn A, with which we knit alignment rows, should be of a darker, brighter, and more vivid color. Unraveled for the second time.
***
Вязание далось сложно. Пока откалибровала верхнюю часть спинки, пришлось ее перевязать четыре раза. Первый раз "окат рукава" разделила на два луча. Когда дошла до укороченных рядов, поняла, что ритм поворотов придется менять не три, а четыре раза. Чем больше разных шагов, тем визуально теряется четкость графики и все превращается в некое месиво. Распустила.
Вторая попытка преподнесла мне урок из теории цвета и графики. Если пальто April и топ Milky Way, в которых используется та же самая техника симметричных укороченных рядов в полосатом узоре платочки, я связала правильно нечаянно, наугад, то здесь я попалась. Я начала укороченные ряды не с той нити, и провязала сглаживающий ряд светлой нитью. Ожидаемый графический эффект не случился. Теперь я уже выучила на всю жизнь, что в этой технике главная нить А, которой мы вяжем сглаживающие ряды, должна быть более темного, яркого и более выразительного цвета. Распустила второй раз.


It's very much OK if your selected colors differ in brightness, saturation, and you can determine which of them is darker. But what to do when the colors are equally bright? Here, a lesson that I learned from a photographer can come to the rescue. Take a color photo of your swatch, and then, in any, even the most straightforward post-production software, turn it into black and white. In it, you immediately determine which of the colors is darker, and it becomes your yarn A. In the picture below, both colors seem to be equally bright, but the color test revealed that yarn A here could be a pink yarn (Elena, thanks for the photo).
***
Хорошо, если вами выбранные цвета четко отличаются по яркости, насыщенности, и можно определить, который из них более темный. А что делать, когда цвета одинаково яркие? Здесь в помощь может прийти урок, которому я научилась у одного фотографа. Сделайте цветную фотографию вашего образца и потом в любой, даже самой простой программе, которая обрабатывает фотографии, превратите ее в черно-белую. В ней вы сразу определите, который из цветов более темный, и он станет вашей нитью А. В фотографии ниже оба цвета кажутся одинаково яркими, но цветовой тест показал, что нитью А здесь может стать розовая нить (Елена, спасибо за фотографию).

The third attempt was again a surprise. The steps of the short row turns got too long. I have already finished everything completely, including the front; sewn, made the neckline band, put on. Everything was fine. And then a thought struck on me. For smaller sizes, the step of the short rows is going to be even longer. The width of the sleeve increases with sizes. If we are working on a regular sleeve from top to bottom, starting from the wrist, which differs little among sizes, then the rhythm of the increases among sizes is significantly different. Here, the sleeve expands by the number of short rows turns, and the smaller the size, the lower the number of turns, and we distribute them more sparsely. And if for my size L, the graphics were still noticeable, for the XS size, it would already be lost. I had to unravel the whole upper part, including the back and front, and reduce the step length from 6 sts to 5 sts.
The fourth attempt was already final. As you can see, it is not enough to see a vision in a dream. You also need to try very hard to materialize it.
***
Третья попытка опять преподнесла сюрприз. Шаги, которые я выбрала для поворотов укороченных рядов, оказались слишком длинными. Я уже связала все полностью, включая перед, сшила, отделала горловину, примерила. Все было хорошо. И потом меня посетила мысль. Для более маленьких размеров шаг укороченных рядов должен быть еще более длинным. Ширина рукава, увеличиваясь размеру, увеличивается, и если бы мы вязали обычный рукав сверху вниз, начиная от запястья, которое мало отличается между размерами, то далее ритм прибавлений для расширения между размерами очень значимо отличается. Здесь рукав расширяется количеством точек поворотов укороченных рядов, и чем размер меньше, тем точек поворотов меньше, и они распределяются более длинными шагами. И если для моего размера L графический рисунок еще просматривался, для размера XS он уже был бы потерян. Пришлось распустить всю верхнюю часть, включая спинку и перед, и участить шаги от 6-и петель до 5-и.
Четвертая попытка уже оказалась конечной. Как видите, мало увидеть образ во сне. Еще нужно очень постараться его материализовать.


I would also like to advise those who are going to knit this pullover. Our most distinctive feature is the length of our arms. It depends more on height, and only to a small extent on the size. For this reason, it is impossible to write a pattern with the ideal sleeve length, and individual adjustment is always necessary. There are no problems in the usual "bottom-up" or "top-down" sleeve. Here it is quite another case. You need to cast on a certain number of stitches for the sleeve, and I do not recommend to change it. The sleeve length contains a certain amount of short row turns in equal steps to the very top of the sleeve cap. Any deviation in step length or number of turns is going to bend the straight line or affect the sleeve width. The only adjustment you can make is to "cut out" one pattern repeat from the bottom of the sleeves, which includes four rows and two turns. The step of the turns is different for each size; the beginning point of the first turn is also different. All these numbers can be found in the pattern. Then you start the sequence of the short rows with the third turn. To keep the neckline depth and sleeve width unchanged, you have to knit four more rows before you start. I think the scheme below explains everything in more detail.
***
Хочу еще предостеречь тех, кто будет вязать этот пуловер. Самая отличительная наша особенность – это длина рук. Она больше зависит от роста, и только в малой степени от размера. По этой причине в описании невозможно попасть с идеальной длиной рукавов, и всегда нужна индивидуальная корректировка. В обычном рукаве "снизу вверх" или "сверху вниз" проблем не возникает. Здесь же укоротить рукав сложнее. Дается определенное количество петель для набора, и менять его не рекомендуется – в нем должно поместиться определенное количество поворотов укороченных рядов равномерным шагом до самой верхушки оката. Любое изменение в длине шага или количестве поворотов искривит прямую линию или окажет воздействие на ширину рукава. Единственная возможная корректировка – это "отрезать" один раппорт с низа рукавов, в котором включены 4 ряда и два поворота. Шаг поворотов у каждого размера разный, также отличается начало первого поворота. Все эти цифры вы найдете в описании. Укороченные ряды вы начнете с третьего поворота, а для того, чтобы высота горловины и ширина рукава остались неизменными, вам придется провязать на 4 ряда больше до вашего начала. Думаю, схема ниже вам объяснит все более подробно.

The testing of the Dream pullover has been numerous. Even my favorite old-timers have returned, and I am incredibly happy about that. Testing went very well. I can't say that like clockwork, but without large disappointments. As always, I left a fair amount of the errors (and how without them), and the Early Birds successfully found and corrected them. Here I show you just a few finished projects to help you with the choice of colors, the amount of positive ease, the length. All other finished projects you find on Ravelry (scroll with arrow).
***
Тестирование пуловера Dream было многочисленным. Вернулись даже мои любимые старожилы, и этому я несказанно рада. Тестирование прошло очень хорошо, не могу сказать, что как по маслу, но и без больших разочарований. Как всегда, я оставляю порцию ошибок (а как без них), а ласточки их успешно находят и исправляют. Я покажу лишь несколько завершенных проектов, чтобы помочь вам с выбором цветов, свободы облегания, длины, а все остальные воплощения вы найдете на Ravelry (прокрутите стрелкой).


I would like to single out one Early Bird who managed to knit two "Dreams" during the testing, one of which was with short sleeveс. You all know her well, and this is our beloved Larissa. "Dream" as a stripy Sailor's top – why not?
***
Хочу выделить одну ласточку, которая сумела в сроки тестирования связать два "Сна", один из которых - с короткими рукавами. Вы все ее хорошо знаете, это наша любимая Лариса. Dream как
тельняшка – а почему бы и нет?


As always, at the end of every testing, I choose the winner. She receives a symbolic prize – one pattern to choose from as a gift. This time the winner was Tatyana, who charmed us with her smile, and who said with her project everything that I wanted to tell myself. Word-for-word, if I may say so. Tatyana, thank you very much!
***
Как всегда, после окончания тестирования я выбираю победительницу, которая получает символический приз – одно описание на выбор в подарок. В этот раз ей стала Татьяна, очаровавшая нас своей улыбкой, и сказавшая своей работой все то, что я сама хотела сказать этим дизайном. Слово в слово, если так можно выразиться. Татьяна, спасибо огромное!


Татьяна, примите поздравления! Ваш Сон такой яркий, сочный, и Вы в нем неотразимы! Айсте, Ваши истории про творческий процесс созидания модели от А до Я так же интересно читать, как и вязать саму модель. Спасибо!
Добрый вечер, Айсте, девочки. Большое спасибо за поздравления. Только что прочитала Ваш пост в блоге. У меня просто нет слов. Сказать, что я счастлива, это не сказать ничего. Я на седьмом небе от счастья. Не ожидала, не надеялась. Связать такой замечательный джемпер - это уже было исполнением мечты. Без перевязов, с потрясающей посадкой. Всегда восхищаюсь Вашими трудоюбием, гениальностью и терпением. А тут ещё такой подарок. Вы волшебница, добрая фея из сказки. У меня вчера был день рождения. Ваше письмо для меня сейчас как визит доброй феи, самый классный сюрприз. Спасибо!!!!!! Умеете Вы делать людей счастливыми !
Айсте, спасибо за рассказ! я поражена и восхищаюсь Вашим трудолюбием...(у меня после второго перевяза нитки и спицы "улетели" бы в дальний угол)
Аисте, восхищаюсь продуманностью мелочей. Всё отточено до совершенства, легко вязать по готовому. А вы раскрыли сейчас сколько труда вложено в это совершенство. Поздравляю не только победительницу, а всех кому посчастливилось прикоснуться к полувер из снов. Аисте, а вам новых творческий идей, воплощение и побед. ❤️❤️❤️❤️❤️
Айсте, каждый пост как повесть о новой победе удивительного дизайнера... так радостно наблюдать за всеми! Ласточки представили такие совершенные модели, как Вы только смогли выбрать лучшую... они все прекрасны!