Ease. Свобода облегания
- Aistė

- Jun 27
- 13 min read
Updated: Jun 29
Эта статья является частью моих курсов по построению вязаного изделия и объединяет основные принципы свободы облегания. Хочу рассказать, как различные конструктивные решения — от типа рукава до глубины проймы и общей формы силуэта — напрямую связаны со свободой облегания. Это понимание необходимо для участников курсов по построению вязаного изделия, потому что оно объясняет не только что мы делаем, но и почему мы это делаем. Когда вы начинаете видеть эти взаимосвязи, построение изделия становится логичной системой, а не набором отдельных приемов, собранных из разрозненных источников.
Свобода облегания (сокр. СО) в одежде бывает нескольких типов.
Техническая, для свободы движений в неэластичных тканях.
Для утепляющего и каркасного пакета (пальто, куртки, пуховики, пиджаки).
Дизайнерская (свободная одежда, моделирование форм и фасонов).
Минусовая для облегания одежды из эластичных тканей.
Для многослойности.
***
This chapter from my upcoming course on knitted garment drafting brings together the core principles of ease. I want to explain how different design decisions — from sleeve type to armhole depth and overall silhouette shape — are directly connected to ease. This understanding is essential for participants in my garment drafting courses, because it explains not only what we do, but also why we do it. Once you begin to see these relationships, garment drafting becomes a logical system rather than a set of separate techniques gathered from different sources.
Ease in clothing can be divided into several types:
Wearing or technical ease — to allow freedom of movement in garments made from non-stretch fabrics.
Ease for insulation or interfacing layers — used in coats, jackets, down-filled garments, and tailored garments such as blazers.
Design ease — used to create relaxed silhouettes and specific garment shapes.
Negative ease — used in garments made from elastic fabrics that are intended to fit closely to the body.
Ease for layering.
В вязании также можно встретить все разновидности свобод, кроме, наверное, первого типа, очень редко встречается второй тип (например, отсутствие плечевого скоса плеча для подплечника, мода начала 90-х) и чаще всего – третий и пятый. Минусовая свобода облегания практически всегда ассоциируется с облегающими вязаными изделиями, в которых используется стягивающий узор "резинка", и в которых, кроме свойства самого трикотажа растягиваться, еще добавляется и эластичность узора.
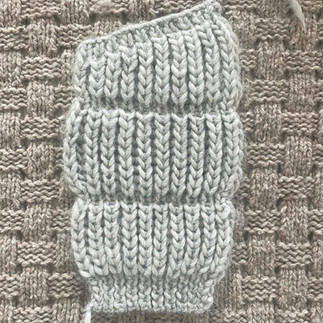
На изображениях ниже как раз представлены два вида растяжения. На первом изображении образец без растяжения. На втором – растяжение узора резиночного типа, не влияющее на длину образца. Образец расширился, но его высота не изменилась. На третьем изображении происходит растяжение трикотажа, которое является деформирующим действием. Вы можете сами увидеть, насколько изменилась высота образца. Если такое растяжение из-за нехватки ширины деталей случается в изделии, оно фиксируется под воздействием тепла и влаги тела. Далее следует деформация изделия. Спинка укорачивается, оголяя шею сзади, задирается перед, рукава становятся короткими и т. п.
***
In knitting, we can encounter all types of ease except, arguably, the first one. The second type is very rare (for example, in historical or specific fashion cases, such as the absence of shoulder slope for shoulder pads, a trend from the early 1990s). The most common types are design ease and layering ease. Negative ease is almost always associated with tight-fitting knitted garments worked in ribbing, where, in addition to the natural stretch of knit fabric, the elasticity of the stitch pattern itself adds further stretch.
In the pictures below, two types of stretch are shown. The first picture contains a swatch, made using a rib-type stitch pattern. The next picture shows a rib stitch stretch, which does not affect the swatch length. The last one contains a knit fabric stretch — a deforming type of stretch. You can compare by yourself how much that affects the swatch height. If this type of stretch occurs in a garment due to insufficient width in the pattern pieces, it becomes fixed by body heat and moisture. This then leads to garment distortion: the back shortens, causing the back neckline to drop and expose the neck, the front hem to lift, and the sleeves to become shorter, among other issues.


В вязаной вещи мы сможем двигаться и дышать, даже если у нее нет свободы облегания или она минусовая. Но в ручном вязании, в котором мы получаем достаточно рыхлое трикотажное полотно, небольшая свобода облегания (3-4 см) приветствуется, даже если вы хотите связать прилегающую вещь очень малого объема. С такой небольшой прибавленной свободой не пропечатываются контуры бюстгальтера, другого нижнего белья, нежелательных рельефов тела.
Дизайнерская свобода облегания
От свободы облегания зависит фасон и рукав изделия.
1. Прилегающие приталенные изделия (маленький объем) с втачным рукавом, немного заходящим на плечо. Общая свобода облегания 0-6 см, в больших размерах 2-8 см.
2. Втачной рукав, проходящий по границе плеча (от маленького до умеренного объема), возможен лишь в моделях, в которых общая свобода облегания находится в границах 4-12 см (в больших размерах – 4-14 см).
3. Втачной рукав в слегка спущенном плече применяется в моделях, у которых свобода облегания помещается в границы 12-20 см (в больших размерах - 12-22 см, умеренный объем).
4. Рубашечный рукав применяется в моделях, у которых свобода облегания помещается в границы 16-30 см (большой объем).
5. Рукав в спущенном плече применяется в моделях, в которых свобода облегания начинается от 20-24 см и больше (большой объем), а конечная форма одежды с максимальной свободой облегания называется пончо.
Мои курсы построения вязаного изделия разделены по признакам свобод облегания, потому, что в каждом случае построение отличается. Поступая на курс, вы соглашаетесь на те границы свободы облегания, которые будут взяты за основу для этого курса. Иначе вам не подойдет система, методика, формулы, и изделие не сядет.
Также нужно понимать, что свобода облегания и мною описанные ее границы очень условные. Свобода облегания измеряется и дается на уровне груди и зависит от размера последней. Свобода облегания в 20 см будет выглядеть совершенно по-разному на обладательницах чашек А и Е, например. Та же свобода облегания на размере XS будет смотреться объемно; свобода облегания в 20 см на размере XXXL будет смотреться очень умеренно. Так что мною данные выше числа прибавленной свободы на облегание только приблизительные и ориентировочные, имеющие гибкие границы.
На фото ниже показаны некоторые случаи используемых свобод и как от этого зависит форма рукава. С каждым шагом прибавления СО плечо все больше опускается, пройма сужается и под конец становится щелевидной. Наведите курсор на фотографию, чтобы узнать, сколько свободы облегания добавлено в каждом случае.
***
In a knitted garment, we can move and breathe comfortably even when no positive ease is added, or when negative ease is used. However, hand-knitted fabric is generally softer and less dense than industrial knitwear. For this reason, a small amount of positive ease (3–4 cm / 1¼–1½ in) is usually desirable, even in garments intended to fit closely to the body. Such a small amount of ease helps prevent bra lines, underwear lines, and other unwanted body contours from showing through the fabric.
Design Ease
The level of ease determines both the garment silhouette and the type of sleeve that can be used.
1. Close-fitting, waist-shaped garments (small volume) with a set-in sleeve slightly placed on the shoulder. Total ease ranges from 0–6 cm (0–2½ in). For larger sizes, the recommended range is 2–8 cm (¾–3 in).
2. A classic set-in sleeve positioned at the shoulder point can only be used in garments with approximately 4–12 cm (1½–4¾ in) of total ease (small to moderate volume). For larger sizes, the range extends to 4–14 cm (1½–5½ in).
3. Shirt/blouse style set-in sleeve is used in garments with approximately 12–20 cm (4¾–8 in) of ease. For larger sizes, the range is 12–22 cm (4¾–8¾ in). These garments have a moderate amount of volume.
4. Oversized casual shirt style set-in sleeve is typically used in garments with 16–30 cm (6¼–12 in) of ease. These garments have a generous, oversized fit.
5. Drop shoulder sleeve is used in garments where ease begins at approximately 20–24 cm (8–9½ in) and continues upward. At the very end of the ease spectrum, the resulting silhouette approaches a poncho.
My garment drafting courses are based on added ease levels because the drafting method differs in each case. By enrolling in a course, you agree to work within the added ease range that the course is based on. Otherwise, the system, methodology, and formulas will not apply correctly, and the garment will not fit as intended.
It is also important to understand that ease and the ranges described above are only approximate guidelines. Ease is measured at the bust level, and its visual effect depends heavily on bust size.
For example, 20 cm (8 in) of ease will look completely different on a person with a cup A bust than on someone with a cup E (DD) bust. The same amount of ease may appear quite oversized on a size XS, while looking relatively moderate on a size XXXL. For this reason, all ease values given above should be considered approximate reference points rather than rigid rules. Their boundaries are flexible.
The illustrations below show several examples of different amounts of ease and how they affect sleeve type. As ease increases, the shoulder line drops progressively lower, the armhole narrows, and eventually it develops into a slit-like opening. Hover on to see the amount of positive ease added to each case.


Другие фасоны
Реглан моделируется от базовых основ в первых трех случаях свободы облегания; в более значимых прибавленных свободах изделие может быть размоделировано только в форму, напоминающую реглан, по сути своей она остается изделием со спущенным плечом. См. ниже, первое изображение. Справа удален шов, присоединяющий рукав, и он перенесен от подмышки к горловине. Этот шов действительно напоминает регланную линию. Но от перенесенного шва фасон изделия не меняется, он все равно остается спущенным плечом, он не становится настоящим регланом.
И для его расчетов сначала строится фасон спущенного плеча, а потом просто переносится линия проймы.
У "настоящего" реглана присутствует плечевая вытачка или шов вдоль плеча; оба отображают и повторяют изгиб плеча. Также есть подрезы в пройме, огибающие бок. Если этих признаков нет, изделие остается фасоном спущенного плеча, неважно, где проходит линия шва, и есть ли она вообще.
***
Other garment styles
Raglan can be drafted from the base body blocks within the first three ease categories (small to moderate ease). With greater ease, the design can only be adapted into a raglan-inspired shape, but it's clearly not a raglan. However, in essence, it remains a drop-shoulder garment. See the first image below. On the right, the sleeve attachment seam is removed and shifted from the underarm to the neckline, creating a line that resembles a raglan seam. However, this change in seam placement does not alter the garment type — it remains a drop-shoulder design and does not become a true raglan.
In this case, the drop-shoulder shape is drafted and calculated first, and only then is the armhole line shifted.
In a “true” raglan, a shoulder dart or a seam runs along the shoulder; both reflect and follow the rounded shoulder shape. There are also underarms at the bottom of armholes that wrap around the side of the body. If these features are not present, the garment remains a drop-shoulder style, regardless of where the seam line is placed or whether it exists at all.


Цельновязанный рукав
Фасонам со спущенным плечом принадлежит и цельновязанный рукав или "летучая мышь". У него лишь отсутствует шов, присоединяющий рукава к лифу. См. выше, второе изображение. Шов, присоединяющий рукав к лифу, на правой стороне изображения удален, правая сторона теперь цельновязаная. Но от стертого шва фасон изделия не меняется, он все равно остается фасоном спущенного плеча.
И для его расчетов сначала строится фасон спущенного плеча, а потом просто удаляется линия проймы.
***
Kimono/dolman sleeves
Drop-shoulder garments also encompass the kimono/dolman sleeves. The only difference is the seam, which attaches the sleeves to the bodice. See above, second image. On the right, the seam joining the sleeve to the bodice has been removed, and the right side has turned in kimono/dolman style. However, the removal of this seam does not change the garment style; it still remains a drop-shoulder design.
In this case, the drop-shoulder shape is drafted and calculated first, and only then is the armhole line removed.
Есть сомнения?
У вас могут возникнуть два вопроса:
1. Почему нельзя вязать втачной рукав в изделиях с большой свободой облегания?
2. Почему нельзя вязать спущенное плечо в изделиях с маленькой свободой облегания?
Попробую ответить на первый вопрос. Если изделие очень свободное, проймы у такого изделия будут очень глубокие для того, чтобы достичь границу плеча. То есть подрезы у такой проймы будут несоразмерно широкие. Рукав в нижней части оката должен отчасти повторять форму нижней части проймы, иначе его не вшить; при широких подрезах окат становится слишком узким в верхней части и он начинает затягивать на себя верхнюю часть лифа. Или тогда рукав должен быть непропорционально широким, чтобы хватило ширины оката после выполнения таких подрезов. Но тогда не хватит периметра проймы для такого большого оката.
***
Any doubts?
You may have two questions:
Why can’t a set-in sleeve be used in oversized garments?
Why can’t a drop-shoulder design be used in fitted garments?
Let me try to answer the first question. If the garment is relaxed, the armholes may become very deep to reach the shoulder line. This means that the underarms in such an armhole will be disproportionately wide. The lower part of the sleeve cap must partially match the shape of the lower part of the armhole; otherwise, it cannot be set in. With wide underarms, the sleeve cap becomes too narrow at the top and may pull the upper bodice inwards. Alternatively, the sleeve would need to be disproportionately wide to accommodate such underarms and still maintain adequate sleeve cap width. But in that case, there would not be enough armhole perimeter to fit such a large sleeve cap.

Теперь попробую ответить на второй вопрос.
Немного отвлечемся. Зачем пройме подрезы? Подрезы – нижняя часть проймы, которую мы при вязании закрываем горизонтально в один прием. Их предназначение – обогнуть наши бока и позволить спинке и переду встретиться у бокового шва, – таким образом изделие прилегает к телу. Чем шире изделие, чем больше СО, тем больше изделие отдаляется от тела и огибать бока больше не нужно. Боковой шов образуется в пространстве в более плоском проявлении. Вот почему пройма в таких изделиях называется щелевой (щель) и у нее отсутствуют подрезы.
Возвращаемся. Если изделие прилегающее и у него фасон спущенного плеча, это сразу означает щелевидную пройму и отсутствие подрезов. Изделие малого объема без подрезов все равно огибает бока и прислоняется к ним. Оно как бы искусственно создает подрезы, затягивая ткань в зону подмышек. По этой причине образуются складки и заломы, которые не только портят вид, но и физически чувствуется утолщениями в подмышках, если опустить руки.
***
Now I will try to answer the second question.
Let’s briefly step aside. Why do armholes have underarms? Underarms are the lower part of the armhole that is bound off in a single step in knitting. Their purpose is to wrap around the sides of the body and allow the front and back to meet at the side seam, so the garment fits the body. The greater the ease in a garment, the further it sits away from the body, and there is no longer a need for the armhole to wrap around the sides. The side seam then connects the front and back away from the body and hangs freely, without following the rounded shape of the body. That is why in such garments, the armhole is referred to as a slit armhole and has no underarms.
Returning to the topic. When a garment is fitted and designed with a drop-shoulder, this implies a slit armhole and the absence of underarms. However, even in a fitted garment without underarms, the sides still wrap around the body and sit close. This creates an artificial formation of underarms, as the fabric is pulled into the underarm area. As a result, drag lines and folds appear, which not only affect the look of the garment but are also physically felt as bulk in the underarm area, with the arms hanging naturally.


Как должен выглядеть фасон спущенного плеча?
У фасона спущенного плеча должно быть достаточно свободы облегания, чтобы сзади сформировались красивые складки (фалды) по обеим сторонам, идущие от конца плеча до самого низа изделия. В этих складках как раз и закладывается вся прибавленная свобода облегания, и она должна быть достаточной для того, чтобы складка заложилась.
Такая складка может появиться и на передней стороне изделия, но чаще всего ее забирает грудь, если изначально ширина переда и спинки была одинаковой.
***
How should a proper drop-shoulder style look?
A drop-shoulder style needs enough ease for soft folds to appear at the back on both sides, running from the end of the shoulder down toward the hem. This is where the whole added ease is distributed, and there must be enough of it for these folds to develop properly and hold their shape.
A similar fold can sometimes appear at the front as well, but in most cases it is absorbed by the bust if the front and back widths were drafted the same at the beginning.


Свобода облегания для многослойности
Стоит поговорить о свободе облегания для многослойных образов. Если изделие широкое и свободное по своему дизайну, оно сразу выполняет функцию для создания многослойных образов, и часто приходится думать об обратном. Поместится ли такая свобода под верхнюю одежду? Но, если нет задачи вязать очень свободное изделие, обязательно стоит подумать, что вы будете под него носить.
Всю одежду можно поделить на три слоя:
Первый слой – блузы, рубашки, водолазки, футболки, платья.
Второй слой – вязаное (кардиганы, пуловеры, джемперы), жакеты, пиджаки, жилеты.
Верхний слой – пальто, куртки, тренчи.
С каждым слоем свобода облегания увеличивается, чтобы нижний слой мог поместиться под верхним. И здесь свобода облегания касается не только той, которая прибавляется к лифу, но и к ширине рукавов и даже к длине талии спинки и переда.
Прибавление длины к спинке и переду до талии предназначено для того, чтобы линия талии изделия не приподнималась слишком высоко, если поддеть, скажем, блузу с подплечниками или толстый свитер с аранами. К счастью, в вязаном прибавлять к длине талии не нужно, так как вязаное изделие и так всегда немного растягивается под своим весом. Но о ширине самого изделия, особенно, рукавов, стоит подумать, если изделие планируется носить вторым слоем, и нет желания, чтобы каждая складка рубашки, пуговки на карманах или драпировка платья пропечатывалась.
***
Ease for layering
It is worth looking at ease in the context of layering. When a garment is designed to be relaxed and oversized, it naturally serves as a layering piece, and the question often becomes the opposite. Will this amount of ease still fit under outerwear? If the goal is not to create an oversized piece, it is important to consider what you plan to wear underneath it.
Clothing is generally divided into three layers:
First layer – blouses, shirts, turtlenecks, T-shirts, dresses.
Second layer – knitted garments (cardigans, pullovers, jumpers), jackets, blazers, vests.
Outer layer – coats, jackets, trench coats.
With each layer, ease increases so that the underlying layers can fit comfortably underneath. Here, ease does not only refer to the body width, but also to sleeve width and even to torso length ("waist to shoulder" measurement).
Adding length through the body up to the waist helps prevent the waistline from riding up too high when another garment is worn underneath, such as a blouse with shoulder pads or a thick cable-knit sweater. Fortunately, in knitting, this is usually not necessary, as knitted fabric naturally stretches lengthwise slightly under its own weight.
However, the overall volume of the garment — especially the sleeves — still needs to be considered if it is intended as a second layer, to avoid every fold of a shirt, pocket buttons, or drape of a dress showing through on the surface.


Все элементы, рассмотренные в этой статье — свобода облегания, типы рукавов, форма проймы и многослойность — не являются отдельными понятиями, а представляют собой части единой системы. Изменение одного параметра неизбежно влияет на остальные. Понимание этих взаимосвязей лежит в основе всех моих курсов по построению вязаного изделия. Чем лучше вы понимаете, почему принимаются те или иные конструктивные решения, тем проще вам будет самостоятельно анализировать модели, уверенно вносить изменения и создавать изделия, которые дают именно тот результат, который вы хотите получить.
***
All the elements discussed in this chapter — ease, sleeve types, armhole shape, and layering — are not separate concepts but parts of a single system. A change in one parameter inevitably affects the others. Understanding these relationships is fundamental to all of my knitted garment drafting courses. The better you understand why certain drafting decisions are made, the easier it becomes to analyze designs independently, modify them with confidence, and create garments that achieve the result you want.


Comments