Kitchener Stitch Encyclopedia. Энциклопедия трикотажного шва
- Aistė

- Jun 11, 2020
- 26 min read
Updated: Aug 4, 2020
This article does not focus on knitting, mainly on how to fix mistakes, failures, and shortcomings after your project is already finished, or give it a second life. I want to tell you everything that is possible about a Kitchener Stitch. A Kitchener Stitch joins live stitches. It is invisible and creates one row, as if we knitted it with knitting needles, only in the middle of the knit fabric. With a Kitchener Stitch, we can join the shoulders when a reinforced and inextensible seam is not required; to set in sleeves in projects with a drop shoulder; lengthen or shorten the sleeves or body without unraveling the entire piece; change, lengthen and shorten ribs or hems; also fix the error in a stitch pattern if we notice it after the piece is finished.
For a Kitchener Stitch, you need to prepare two edges with live stitches (they can be worked in the same direction or, on the contrary, in the counter direction), a yarn tail of about 3,5 lengths of the joined edge and a tapestry needle. In some cases, you may need a seam ripper, a crochet hook for runaway stitches, knitting needles, an iron or steamer, scissors.
When grafting with a Kitchener Stitch, be very careful. If any of the stitches we graft get twisted, it means that you inserted the tapestry needle in the wrong direction. An exception is permissible only in the penultimate chapter, where we are going to focus on twisted stitches.
***
В этой статье речь пойдет не о вязании, а о том, как исправлять ошибки, неудачи и недочеты после того, как ваше изделие уже связано, и, может быть, даже вернуть ему вторую жизнь. Здесь расскажу все, что возможно, о трикотажном шве. Трикотажный шов соединяет открытые петли, является невидимым, и создает один ряд, как бы мы вязали его спицами, только в середине полотна. Трикотажным швом мы можем соединять плечи, когда не требуется укрепленный и нерастяжимый шов; пришить рукава в изделиях со спущенным плечом; удлинять, укорачивать рукава или корпус, не перевязывая всю деталь; менять, удлинять и укорачивать резинки или планки; также исправить сбившийся узор, если мы заметили ошибку после того, как деталь завершена.
Для трикотажного шва нужно подготовить два края с открытыми петлями (они могут быть связаны в том же самом или, наоборот, встречном направлении), нить, длиною примерно в 3,5 длины соединяемого края и гобеленовую иглу. В некоторых случаях может понадобиться вспарыватель, крючок для убежавших петель, спицы, утюг или отпариватель, ножницы.
Сшивая трикотажным швом, будьте очень внимательными. Если любая из петель, которую мы прошили, легла скрещенной, значит, вы ввели иглу в неправильном направлении. Исключение допустимо только в предпоследнем разделе, где речь пойдет как раз о скрещенных петлях.
Changing the Ribs.
Меняем резинки
Let's examine one of the cases when I decided to change the ribs.
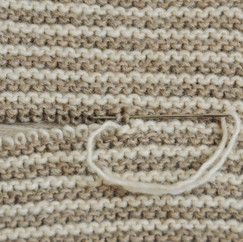
1. The rib was too loose. I decided to knit a denser rib with thinner knitting needles. The number of stitches of the old and the new rib came out differently. For this reason, I knitted two rows with a Stockinette Stitch in which I equalized the number of stitches with the back piece.
2. Since two rows of a Stockinette Stitch were already made on a new rib, it was the third row of a Stockinette Stitch that was chosen for unraveling.
Cut the yarn of one stitch in the third row from the rib for a few stitches from the edge with a seam ripper.
3. Very carefully, unravel the yarn of the third row to the edge of the piece stitch by stitch.
4. Cut the stitch through 5-12 cm from the first cut point. Release the yarn ends.
5-6. Pull the yarn out. The distance between the ripping points depends on how tangled is the stitch pattern itself and how strong or slippery the yarn is. Sometimes you can pull the yarn in one take over the entire width of the piece, and sometimes you have to unravel it in short steps or only one stitch at a time.
7. Make the same cut on the opposite side of the piece. Unravel the yarn to the edge. This short yarn tail needs to be saved – you will need to weave in it later.
8-9. Pull out the yarn in the last step. The rib is separated.
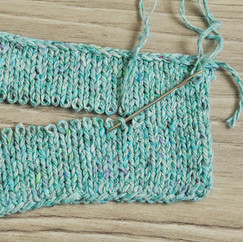
10. Before breaking the yarn on a new rib, leave the tail, which is 3,5-4 times longer than the horizontal length of the upcoming seam (the joining edge), and thread it into a tapestry needle.
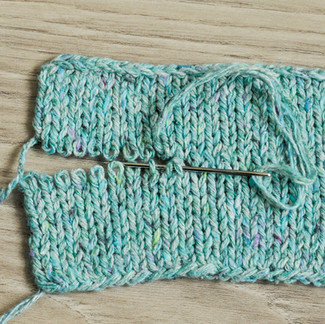
11. Start to join live stitches with a Kitchener Stitch. Live stitches can be placed onto the knitting needle slipping one at a time while grafting them, or you can keep them unstrung if the pieces have been pressed, steamed, or washed before. Stitches after the blocking (with contact with water and heat) are fixed and do not run away. If a random stitch nevertheless unravels, it can be fixed with a crochet hook.
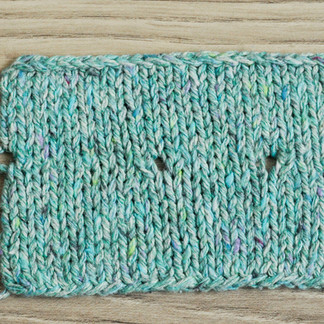
12. The last picture compares the new and the old one rib. The new rib (at the bottom) is denser, the goal has been achieved, and the joining row is almost invisible. After the final wash, the Kitchener Stitch smoothes out and merges with the knit fabric. A Kitchener Stitch restored the unraveled third row.
***
Предлагаю разобрать один из случаев, когда я решила поменять резинки.
1. Резинка оказалась слишком рыхлая. Было принято решение связать более плотную резинку более тонкими спицами. Количество петель старой и новой резинки отличалось. По этой причине было провязано 2 ряда лицевой гладью, чтобы в них выйти на нужное количество петель на спинке.
2. По причине того, что 2 ряда гладью уже были выполнены на новой резинке, именно третий ряд гладью был выбран для отсоединения.
Отрезать вспарывателем нить петли в третьем ряду за несколько петель от края.
3. Осторожно, петелька за петелькой распустить нить третьего ряда до самого края.
4. Отрезать петлю через 5-12 см от первой точки. Распустить кончики.
5-6. Вытянуть нить. Расстояние между точками разреза нити зависит от узора и насколько крепкая или скользкая нить. Иногда можно вытащить нить сразу по всей ширине детали, а иногда приходится распускать короткими отрезками или всего по одной петельке.
7. Сделать такой же самый разрез на противоположной стороне детали. Распустить нить. Этот кончик нужно сохранить – он понадобится, чтобы далее вплести его и закрепить.
8-9. Вытянуть нить в последнем отрезке. Резинка отделилась.
10. Перед тем, как отрывать нить на новой резинке, оставить конец нити длиною в 3,5-4 раза больше горизонтальной длины предстоящего шва (соединяемого края) и продеть его в гобеленовую иглу.
11. Начать соединять открытые петли трикотажным швом. Открытые петли можно переместить на спицы и снимать петли, постепенно их прошивая, а можно держать открытыми, если до этого деталь была отпарена или постирана. Петли после ВТО фиксируются и не убегают. Если случайная петелька все же убежит, ее можно поймать и вернуть крючком.
12. На последней фотографии – сравнение. Новая резинка (внизу) более плотная, цель достигнута, а место соединения почти невидимое. После финальной стирки трикотажный шов разглаживается и сливается. Трикотажный шов также вернул распущенный третий ряд.


A Kitchener Stitch at the Beginning of the Row.
Трикотажный шов в начале ряда

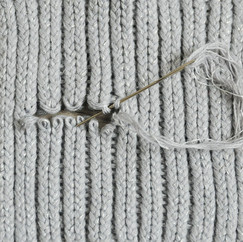
How to start a Kitchener Stitch? It seems that everything is quite simple, just begin to graft, and that's it. But if you misplace the first stitch, in the end, you get the tiny shift of the joined pieces by half the stitch. After the piece is sewn with a mattress (or any other) stitch, a shift of half the stitch at the seam is going to be very noticeable. And if your project uses any, even the simplest stitch pattern, the half-stitch displacement becomes noticeable right away after grafting just a few stitches.
1. Thread the yarn tail of the bottom piece into the tapestry needle.
2. The top row. Insert the needle from the bottom up into the edge (selvage) stitch of the first row of the top piece and into the half of the selvage stitch, which is slightly higher. Pull the yarn.
3. The bottom row. Insert the needle into the selvage stitch of the lower piece from top to bottom and through the second (next) stitch from the bottom up. Pull the yarn.
4. The top row. Insert the needle into the selvage stitch of the upper piece from top to bottom (do not stitch the previously sewn half of the upper selvage stitch, just leave it as is) and through the second (next) stitch from the bottom up.
5-6. Continue grafting with a Kitchener Stitch (see below).
***
Как начать трикотажный шов? Казалось бы все просто, начали сшивать, и дело с концом. Но если начать не с той петли, в итоге несложно получить смещение соединяемых полотен на половину петли. После того, как деталь будет сшита матрасным (или любым другим) швом, смещение на половину петли у шва будет очень бросаться в глаза. А если ваши соединяемые полотна имеют любой, хоть самый простейший узор, смещение станет заметно сразу, как будет прошито всего лишь несколько петель.
1. Вдеть нить нижнего полотна в гобеленовую иглу.
2. Верхний ряд. Ввести иглу снизу вверх в кромочную петлю первого ряда верхнего полотна и в половинку кромочной петли, которая находится немного выше. Вытянуть нить.
3. Нижний ряд. Ввести иглу в кромочную петлю нижнего полотна сверху вниз, вывести через вторую (следующую) петлю снизу вверх. Вытянуть нить.
4. Верхний ряд. Ввести иглу в кромочную петлю верхнего полотна сверху вниз (ранее прошитую половинку кромочной больше не прошивать), вывести через вторую (следующую) петлю снизу вверх.
5-6. Продолжить сшивать трикотажным швом (см. ниже).


A Basic Kitchener Stitch in а Stockinette Stitch. "Down-up, down-up"
Трикотажный шов в лицевой глади. "Вниз-вверх, вниз-вверх"
Let's dive into the basic Kitchener Stitch in a Stockinette Stitch, then analyze individual cases in simple and most often used stitch patterns. Also, what to do if the number of stitches in the joined pieces is different, and at the very end to touch on the features of the counter knitting.
The basic principle of a Kitchener Stitch is that each stitch (with a few exceptions) should be sewn (or grafted) twice.
***
Теперь предлагаю рассмотреть самый обычный трикотажный шов в лицевой глади, а далее разобрать отдельные случаи в простых и часто встречаемых узорах, также, что делать, если количество петель отличается, и в самом конце коснуться особенностей встречного вязания. Главный принцип трикотажного шва – каждая петля (с небольшими исключениями) должна быть прошита два раза.

1. The bottom row. Insert the needle into the first, previously grafted once stitch from top to bottom, and pull through the second (next) stitch from the bottom up.
2. The top row. Insert the needle into the first, previously grafted once stitch from top to bottom, and pull through the second (next) stitch from the bottom up.
3. The stitch is created. Repeat steps 1-2 until you have grafted all the stitches together. Do not overtighten the yarn. A row created with a Kitchener Stitch should correspond to the friability or density of the rest of the knit fabric.
***
1. Нижний ряд. Ввести иглу в первую, ранее один раз прошитую петлю сверху вниз, вывести через вторую (следующую) петлю снизу вверх.
2. Верхний ряд. Ввести иглу в первую, ранее один раз прошитую петлю сверху вниз, вывести через вторую (следующую) петлю снизу вверх.
3. Петля сформирована. Повторять пункты 1-2, пока не будут прошиты все петли. Нить сильно не затягивать. Ряд, сформированный трикотажным швом, должен соответствовать рыхлости или плотности всего остального полотна.


A Kitchener Stitch that Changes the Number of Stitches.
Трикотажный шов, меняющий количество петель
Sometimes it may happen that in the pieces you need to join, the number of stitches does not match. Let's say, you shorten the sleeve, and the lower piece has two stitches less than the upper piece, and you need to increase while grafting. Or it could be the other way round. You need to graft a rib that has more stitches than, say, the back piece, to which you need to attach the rib. Here you have to decrease. The task of a Kitchener Stitch here is to equalize the number of stitches by increasing or decreasing.
Left-leaning decrease
1. The bottom row. Insert the needle into the first, previously grafted once stitch from top to bottom and pull through the next two stitches from the bottom up. Pull the yarn. In the top row, graft the two stitches with a basic Kitchener Stitch.
2. With the next stitch in a bottom row, graft both stitches to be decreased at once, inserting the needle from top to bottom, and pull the needle through the next (third) stitch from the bottom up. Pull the yarn.
3. In the top row, graft stitches with a basic Kitchener Stitch.
***
Иногда может случиться так, что в нижней или в верхней части полотна количество петель не совпадает. Скажем, вы укорачиваете рукав, и нижняя часть имеет на две петли меньше, чем верхняя часть. Здесь вам будет нужно сшивая прибавить. Может быть и наоборот. Вы пришиваете резинку, на которой больше петель, чем, скажем, на спинке. Здесь вам придется сшивая убавить. Задача трикотажного шва – сравнять количество петель прибавляя или убавляя.
Убавление с наклоном влево
1. Нижний ряд. Ввести иглу в первую, ранее один раз прошитую петлю сверху вниз, вывести через две следующие петли снизу вверх. Вытянуть нить. В верхнем ряду прошить две петли лицевым трикотажным швом.
2. Следующим стежком в нижнем ряду прошить обе убавляемые петли, вводя иглу сверху вниз, и вывести иглу через следующую (третью) петлю снизу вверх. Вытянуть нить.
3. В верхнем ряду прошить две петли лицевым трикотажным швом.


Right-leaning decrease
1-2. Bottom row. Insert the needle into the first, previously grafted once stitch from top to bottom; pull through the next two stitches from the bottom up – first through the third, then through the second stitch (swap). Pull the yarn. In the top row, graft two stitches with a basic Kitchener Stitch.
3. With the next stitch in a bottom row, graft both stitches to be decreased at once, inserting the needle from top to bottom. Then pull the needle through the next stitch from the bottom up. Pull the yarn. In the top row, graft two stitches with a basic Kitchener Stitch.
***
Убавление с наклоном вправо
1-2. Нижний ряд. Ввести иглу в первую, ранее один раз прошитую петлю сверху вниз; вывести через две следующие петли снизу вверх – сначала через третью, потом через вторую (поменять местами). Вытянуть нить. В верхнем ряду прошить петли лицевым трикотажным швом.
3. Следующим стежком в нижнем ряду прошить обе убавляемые петли, вводя иглу сверху вниз, и вывести иглу через следующую петлю снизу вверх. Вытянуть нить. В верхнем ряду прошить петли лицевым трикотажным швом.


Left-leaning increase
1. The top row. Insert the needle into the first, previously grafted once stitch from top to bottom, and pull through the next two stitches from the bottom up.
2. Pull the yarn and graft two stitches in the bottom row with a basic Kitchener Stitch.
3. With the next stitch in a bottom row, graft both stitches to be increased at once, inserting the needle from top to bottom, and pull it through the next (third) stitch from the bottom up.
***
Прибавление влево
1. Верхний ряд. Ввести иглу в первую, ранее один раз прошитую петлю сверху вниз, вывести через две следующие петли снизу вверх.
2. Вытянуть нить и прошить две петли в нижнем ряду лицевым трикотажным швом.
3. Следующим стежком в верхнем ряду прошить обе прибавляемые петли, вводя иглу сверху вниз, и вывести через следующую (третью) петлю снизу вверх.


Right-leaning increase
1. The top row. Insert the needle into the first, previously grafted once stitch from top to bottom; pull through the next two stitches from the bottom up – first through the third, then through the second stitch (swap). Further – as in the left-leaning increase.
2. The second picture illustrates decreases and increases, made with a Kitchener Stitch.
***
Прибавление вправо
1. Верхний ряд. Ввести иглу в первую. ранее один раз прошитую петлю сверху вниз; вывести через две следующие петли снизу вверх – сначала через третью, потом через вторую (поменять местами). Далее – как в прибавлении влево.
2. На второй фото изображены убавления и прибавления, выполненные трикотажным швом.


A Reverse Kitchener Stitch. "Up-down, up-down"
Трикотажный шов в изнаночной глади. "Вверх-вниз, вверх-вниз"
If the reverse Stockinette Stitch is grafted with the basic Kitchener Stitch from the wrong side, the Reverse Kitchener Stitch turns out by itself. But what if there is the only opportunity to graft on the right side, and you want to get the Reverse Kitchener Stitch? Let's consider it. Understanding the Reverse Kitchener Stitch is also necessary to learn how to graft more complex stitch patterns further.
***
Если изнаночную гладь сшивать с изнаночной стороны полотна обычным лицевым трикотажным швом, изнаночный трикотажный шов получится сам собой. Но что делать, если есть единственная возможность сшивать с лицевой стороны, а требуется получить изнаночный трикотажный шов? Давайте, рассмотрим. Понять изнаночный трикотажный шов также необходимо для того, чтобы далее научиться сшивать более сложные узоры.

The Reverse Kitchener Stitch is obtained by inserting the needle in the opposite direction to the basic Kitchener Stitch, and as a result, it creates purl stitches.
1-3. Bottom row. Insert the needle into the first, previously grafted once stitch from the bottom up, and pull through the second (next) stitch from top to bottom. Pull the yarn.
4-6. Top row. Insert the needle into the first, previously grafted once stitch from the bottom up, and pull through the second (next) stitch from top to bottom. Pull the yarn.
Repeat steps 1-6 until you have grafted all the stitches together.
***
Изнаночный трикотажный шов получается, если вводить иглу противоположно лицевому трикотажному шву. В итоге создаются изнаночные рубчики.
1-3. Нижний ряд. Ввести иглу в первую, ранее один раз прошитую петлю снизу вверх, вывести через вторую (следующую) петлю сверху вниз. Вытянуть нить.
4-6. Верхний ряд. Ввести иглу в первую, ранее один раз прошитую петлю снизу вверх, вывести через вторую (следующую) петлю сверху вниз. Вытянуть нить.
Повторять пункты 1-6, пока не будут прошиты все петли.


A Garter Kitchener Stitch. "Up-down, down-up"
Трикотажный шов в платочной вязке. "Вверх-вниз, вниз-вверх"
A Garter Kitchener Stitch is a combination of the two previous ones: the basic and the reverse Kitchener Stitch, where one side creates a purl stitch, the other side shapes a knit stitch. We make Garter Stitch by knitting on both sides, but if you look only on one side, the Garter Stitch, in fact, consists of a series of knit and purl rows: one knit row, one purl row, etc. That is how we knit a Garter Stitch in the round knitting. And the task of the Garter Kitchener Stitch here is to recreate this situation. We recently used this stitch in the testing of the Dream pullover. In it, we grafted shoulders and sleeves just by this technique. If you are going to knit Dream pullover, this chapter is going to be very useful to you.
Before you begin, make sure in which – top or bottom – row you need to get the purl stitch, and in which - the knit stitch. Move the needle up and down to create the first, move down and up – the second.
***
Трикотажный шов в платочной вязке – это гибрид двух предыдущих: лицевого и изнаночного, где одна его сторона создает рубчик изнаночной глади, другая сторона формирует лицевую гладь. Платочку мы вяжем только лицевыми петлями с обеих сторон вязания, но если посмотреть только с одной стороны, платочная вязка, по сути, состоит из череды лицевых и изнаночных рядов: один лицевой ряд, один изнаночный ряд и т. д. Именно так мы вяжем платочку по кругу. И задача трикотажного шва здесь воссоздать эту ситуацию. Mы недавно использовали этот шов в тестировании джемпера Dream. В нем мы сшивали плечи и рукава как раз таким методом. Если вы будете его вязать, этот раздел вам очень пригодится.
Перед началом убедитесь, в каком – верхнем или нижнем – ряду вам нужнен рубчик изнаночной глади, а в каком – лицевая петля. Движение иглой "вверх-вниз" создаст первый, движение "вниз-вверх" – вторую.


1-2. Bottom row. Insert the needle into the first, previously grafted once stitch from the bottom up, and pull through the second (next) stitch from top to bottom. Pull the yarn.
3-4. Top row. Insert the needle into the first, previously grafted once stitch from top to bottom, and pull through the second (next) stitch from the bottom up. Pull the yarn.
Repeat steps 1-4 until you have grafted all the stitches together.
***
1-2. Нижний ряд. Ввести иглу в первую, ранее один раз прошитую петлю снизу вверх, вывести через вторую (следующую) петлю сверху вниз. Вытянуть нить.
3-4. Верхний ряд. Ввести иглу в первую, ранее один раз прошитую петлю сверху вниз, вывести через вторую (следующую) петлю снизу вверх. Вытянуть нить.
Повторять пункты 1-4, пока не будут прошиты все петли.


A Kitchener Stitch in Lace. How to Make Eyelets (Yarn Overs)
Трикотажный шов в ажуре. Как "вышить" накиды
Yarn Over (with right-leaning decrease)
1. The bottom row. Insert the needle into the first, previously grafted once stitch from top to bottom, and pull through the next two stitches from the bottom up. Pull the yarn.
2. The top row. Insert the needle into the first, previously grafted once stitch from top to bottom, and pull through the second (next) stitch from the bottom up.
3. The bottom row. Insert the needle into two previously grafted together stitches top to bottom. Pull the yarn.
4. The top row. Insert the needle into the first, previously grafted once stitch from top to bottom, and pull through the second (next) stitch from the bottom up.
5. Bottom row. Insert the needle into the next stitch from the bottom up and pull the yarn.
6. The top row. Insert the needle into the first, previously grafted once stitch from top to bottom, and pull through the second (next) stitch from the bottom up.
7. The bottom row. Insert the needle into the first, previously grafted once stitch from top to bottom, and pull through the second (next) stitch from the bottom up.
8. Continue grafting with a basic Kitchener Stitch until the next eyelet.
***
Накид (убавление с наклоном вправо)
1. Нижний ряд. Ввести иглу в первую, ранее один раз прошитую петлю сверху вниз, вывести через две следующие петли снизу вверх. Вытянуть нить.
2. Верхний ряд. Ввести иглу в первую, ранее один раз прошитую петлю сверху вниз, вывести через вторую (следующую) петлю снизу вверх.
3. Нижний ряд. Ввести иглу в две ранее вместе прошитые петли сверху вниз. Вытянуть нить.
4. Верхний ряд. Ввести иглу в первую, ранее один раз прошитую петлю сверху вниз, вывести через вторую (следующую) петлю снизу вверх.
5. Нижний ряд. Ввести иглу в следующую петлю снизу вверх и вытянуть нить.
6. Верхний ряд. Ввести иглу в первую, ранее один раз прошитую петлю сверху вниз, вывести через вторую (следующую) петлю снизу вверх.
7. Нижний ряд. Ввести иглу в первую, ранее один раз прошитую петлю сверху вниз, вывести через вторую (следующую) петлю снизу вверх.
8. Продолжить сшивать лицевым трикотажным швом до следующего накида.


Yarn Over (with left-leaning decrease)
1. The bottom row. Insert the needle into first, previously grafted once stitch of two from top to bottom. Pull the yarn.
2. The top row. Insert the needle into the first, previously grafted once stitch of two from top to bottom, and pull through the second (next) stitch from the bottom up.
3. The bottom row. Insert the needle into the third, then into the second stitch from the bottom up (swap). Skip the first, previously grafted once stitch. Pull the yarn.
4. The top row. Insert the needle into the first, previously grafted once stitch of two from top to bottom, and pull through the second (next) stitch from the bottom up.
5. With the next stitch in a bottom row, graft both stitches to be decreased at once, inserting the needle from top to bottom and pulling it through the next stitch from the bottom up.
6. Continue grafting with the basic Kitchener Stitch until the next eyelet.
***
Накид (убавление с наклоном влево)
1. Нижний ряд. Ввести иглу в один раз прошитую петлю сверху вниз. Вытянуть нить.
2. Верхний ряд. Ввести иглу в первую, ранее один раз прошитую петлю сверху вниз, вывести через вторую (следующую) петлю снизу вверх.
3. Нижний ряд. Ввести иглу в третью, потом во вторую петлю снизу вверх (поменять местами). Первую ранее один раз прошитую петлю пропустить. Вытянуть нить.
4. Верхний ряд. Ввести иглу в первую, ранее один раз прошитую петлю сверху вниз, вывести через вторую (следующую) петлю снизу вверх.
5. Следующим стежком в нижнем ряду прошить обе убавляемые петли, вводя иглу сверху вниз и вывести через следующую петлю снизу вверх.
6. Продолжить сшивать лицевым трикотажным швом до следующего накида.


Eyelets made with a Kitchener Stitch look no different from ones created with knitting needles. The lean of the decrease before and after the yarn over can be adjusted by yourself by analogy.
***
Накиды, вышитые трикотажным швом, ничем не отличаются от накидов спицами. Наклон убавлений перед и после накидов можете регулировать сами по аналогии.
From the previous chapters, we realized that if we need to create a knit stitch, the tapestry needle moves down then up; if we need to create a purl stitch, the needle moves up then down. Further, a Kitchener Stitch becomes much more complicated. We have to insert the needle into the transition stitches, "down-down" and "up-up", from under the stitch, and even in the opposite direction. The following chapters are devoted to the grafting of the stitch patterns such as “Seed”, simple 1x1 and 2x2 ribs, and mirrored twisted stitches. If you learn the essence of the Kitchener Stitch in these patterns, you can graft much more complex patterns, including cables and Japanese lace.
***
Из предыдущих разделов мы поняли, что, если нам нужно создать лицевую петлю, игла двигается вниз-вверх; если нам нужно создать изнаночную петлю, игла двигается вверх-вниз. Далее трикотажный шов становится гораздо более сложным. Нам придется вводить иглу в переходные петли, "вниз-вниз" и "вверх-вверх", из под петли, и даже в противоположном направлении. Следующие разделы посвящены сшиванию таких узоров, как "Рис", простые резинки 1х1 и 2х2 и зеркальная скрещенная резинка. Если вы поймете суть трикотажного шва в этих узорах, вы сможете сшивать трикотажным швом гораздо более сложные узоры, включая араны и японский ажур.
A Kitchener Stitch in a Simple 1x1 Rib. "Up-up, up-down, down-down, down-up"
Трикотажный шов в резинке 1х1. "Вверх-вверх, вверх-вниз, вниз-вниз, вниз-вверх"
Let's say you considered to lengthen the rib. The most seemingly simple solution is to separate the old shorter rib, knit the longer one, and graft it with a Kitchener Stitch, as was already presented at the beginning of this article. But in this case (see below), the main yarn is not suitable for the grafting – fluff can easily get shed away. Even more common are situations where the main stitch pattern is very complex, and then it is easier to lengthen the rib itself without removing it completely. And the very meaning of this chapter is to acquaint you with the transition stitches, running from the knit stitch to the purl stitch and vice versa, which are found in any rib, as well as in cables and other similar stitch patterns where the knit and purl stitches predominate.
First, you separate a piece of the rib by pulling out the yarn; then knit a longer rib. Before pulling out the knitting needle, it is recommended to steam and press the rib still on the knitting needle to fix the stitches. The knitting needle can also be left and stitches removed one by one as we graft them.
***
Скажем, вы задумали удлинить резинки. Самое, казалось бы, простое решение, это отделить короткие резинки, связать более длинные и пришить трикотажным швом, как было показано в начале этой статьи. Но в этом случае (см. ниже) основная пряжа не подходит для сшивания – может слезть весь пух. Еще чаще встречаются ситуации, когда основной узор очень сложный, и тогда легче удлинить резинку, не снимая ее полностью. И сам смысл этого подраздела ознакомить вас с переходящими петлями с лицевой петли на изнаночную и наоборот, которые встречаются в любой резинке, а также в аранах и других похожих узорах, где используются лицевые и изнаночные петли.
Сначала вы отделяете часть резинки, вытаскивая нить; далее вяжете более длинную резинку. Перед тем, как вытащить спицу, рекомендовано резинку на спице отпарить, чтобы зафиксировать петли. Спицу также можно оставить, и снимать петли по мере их прошивания.


A Kitchener Stitch in 1x1 rib is a combination of a basic, reverse, and a Transition Kitchener Stitch. The bottom row of the rib consists of knit and purl stitches; the top row is a little different. One leg of the stitch belongs to the knit stitch, the other leg belongs to the purl stitch and vice versa. Such stitches are named as transition stitches further.
1. The bottom row. Insert the needle into the first, previously grafted once knit stitch from top to bottom and pull through the second (next) purl stitch from top to bottom. Pull the yarn.
2. The top row. Insert the needle into the first, previously grafted once transition stitch from the bottom up and through the second (next) transition stitch from top to bottom. Both grafted legs here belong to the purl stitch of the top row. Pull the yarn.
3. The bottom row. Insert the needle into the first (or previously grafted once) purl stitch from the bottom up, and pull through the second (next) knit stitch from the bottom up. Pull the yarn.
4. The top row. Insert the needle into the first (or previously grafted once) transition stitch from top to bottom and pull through the second (next) stitch from bottom up. Both grafted legs here belong to the knit stitch of the top row. Pull the yarn.
Repeat steps 1-4 until you have grafted all the stitches together.
***
Трикотажный шов в резинке 1х1 – это гибрид лицевого, изнаночного и переходного трикотажного шва. Нижний ряд резинки состоит из лицевых и изнаночных петель; верхний ряд здесь немного отличается. Одна стенка петли принадлежит лицевой петле, вторая стенка – изнаночной петле и наоборот. Такие петли далее будем называть переходными.
1. Нижний ряд. Ввести иглу в первую, ранее один раз прошитую лицевую петлю сверху вниз, вывести через вторую (следующую) изнаночную петлю сверху вниз. Вытянуть нить.
2. Верхний ряд. Ввести иглу в первую, ранее один раз прошитую переходную петлю снизу вверх, вывести через вторую (следующую) переходную петлю сверху вниз. Обе прошитые стенки здесь принадлежат изнаночной петле верхнего ряда. Вытянуть нить.
3. Нижний ряд. Ввести иглу в первую, ранее один раз прошитую изнаночную петлю снизу вверх, вывести через вторую (следующую) лицевую петлю снизу вверх. Вытянуть нить.
4. Верхний ряд. Ввести иглу в первую, ранее один раз прошитую переходную петлю сверху вниз, вывести через вторую (следующую) петлю снизу вверх. Обе прошитые стенки здесь принадлежат лицевой петле верхнего ряда. Вытянуть нить.
Повторять пункты 1-4, пока не будут прошиты все петли.


A Kitchener Stitch in a Seed Stitch. "Up-up, up-down, down-down, down-up"
Трикотажный шов в узоре "Рис". "Вверх-вверх, вверх-вниз, вниз-вниз, вниз-вверх"
A Kitchener Stitch in a "seed" stitch pattern is a combination of a basic, reverse, and a Transition Kitchener Stitch. At its core, it is no different from a Kitchener Stitch for a 1x1 rib.
1. The bottom row. Insert the needle into the first, or previously grafted once knit stitch from the bottom up, and through the second (next) purl stitch from the bottom up. Pull the yarn.
2. The top row. Insert the needle into the first, or previously grafted once transition stitch from the bottom up and through the second (next) transition stitch from top to bottom. Pull the yarn.
3. The bottom row. Insert the needle into the first, or previously grafted once purl stitch from top to bottom, and pull through the second (next) stitch from top to bottom. Pull the yarn.
4. The top row. Insert the needle into the first, or previously grafted once transition stitch from top to bottom, and pull through the second (next) transition stitch from the bottom up. Pull the yarn.
Repeat steps 1-4 until you have grafted all the stitches together.
***
Трикотажный шов в узоре "рис" – это гибрид лицевого, изнаночного и переходного трикотажного шва. По своей сути он ничем не отличается от трикотажного шва для резинки 1х1.
1. Нижний ряд. Ввести иглу в первую, ранее один раз прошитую лицевую петлю снизу вверх, вывести через вторую (следующую) изнаночную петлю снизу вверх. Вытянуть нить.
2. Верхний ряд. Ввести иглу в первую, ранее один раз прошитую переходную петлю снизу вверх, вывести через вторую (следующую) переходную петлю сверху вниз. Вытянуть нить.
3. Нижний ряд. Ввести иглу в первую, ранее один раз прошитую изнаночную петлю сверху вниз, вывести через вторую (следующую) петлю сверху вниз. Вытянуть нить.
4. Верхний ряд. Ввести иглу в первую, ранее один раз прошитую переходную петлю сверху вниз, вывести через вторую (следующую) петлю снизу вверх. Вытянуть нить.
Повторять пункты 1-4, пока не будут прошиты все петли.


A Kitchener Stitch in a 2x2 Rib
Трикотажный шов в резинке 2х2
A Kitchener Stitch in 2x2 rib is a combination of a basic, reverse, and a Transition Kitchener Stitch. The bottom row of the rib consists of knit and purl stitches; the top row here consists of knit and purl stitches, as well as of transition stitches, where one leg of the stitch belongs to the knit stitch, the other leg belongs to the purl stitch and vice versa.
1. The bottom row. Insert the needle into the first, previously grafted once knit stitch from top to bottom, and pull through the second (next) purl stitch from top to bottom. Pull the yarn.
2. The top row. Insert the needle into the first, or previously grafted once transition stitch from the bottom up and through the second (next) purl stitch from top to bottom. Pull the yarn.
3. The bottom row. Insert the needle into the first (or previously grafted once) purl stitch from the bottom up, pull through the second (next) purl stitch from top to bottom. Pull the yarn.
4. The top row. Insert the needle into the first, previously grafted once purl stitch from the bottom up and through the second (next) transition stitch from top to bottom. Pull the yarn.
5. The bottom row. Insert the needle into the first, previously grafted once purl stitch from the bottom up and through the second (next) knit stitch from the bottom up. Pull the yarn.
6. The top row. Insert the needle into the first, previously grafted once transition stitch from top to bottom and through the second (next) knit stitch from the bottom up. Pull the yarn.
7. The bottom row. Insert the needle into the first, previously grafted once knit stitch from top to bottom and through the second (next) knit stitch from the bottom up. Pull the yarn.
8. The top row. Insert the needle into the first, previously grafted once knit stitch from top to bottom and through the second (next) transition stitch from the bottom up. Pull the yarn.
Repeat steps 1-8 until you have grafted all the stitches together.
***
Трикотажный шов в резинке 2х2 – это гибрид лицевого, изнаночного и переходного трикотажного шва. Нижный ряд резинки состоит из лицевых и изнаночных петель; верхний ряд здесь состоит из лицевых и изнаночных петель, а также из переходных, в которых одна стенка петли принадлежит лицевой петле, вторая – изнаночной петле и наоборот.
1. Нижний ряд. Ввести иглу в первую, ранее один раз прошитую лицевую петлю сверху вниз, вывести через вторую (следующую) изнаночную петлю сверху вниз. Вытянуть нить.
2. Верхний ряд. Ввести иглу в первую, ранее один раз прошитую переходную петлю снизу вверх, вывести через вторую (следующую) изнаночную петлю сверху вниз. Вытянуть нить.
3. Нижний ряд. Ввести иглу в первую, ранее один раз прошитую изнаночную петлю снизу вверх, вывести через вторую (следующую) изнаночную петлю сверху вниз. Вытянуть нить.
4. Верхний ряд. Ввести иглу в первую, ранее один раз прошитую изнаночную петлю снизу вверх, вывести через вторую (следующую) переходную петлю сверху вниз. Вытянуть нить.
5. Нижний ряд. Ввести иглу в первую, ранее один раз прошитую изнаночную петлю снизу вверх, вывести через вторую (следующую) лицевую петлю снизу вверх. Вытянуть нить.
6. Верхний ряд. Ввести иглу в первую, ранее один раз прошитую переходную петлю сверху вниз, вывести через вторую (следующую) лицевую петлю снизу вверх. Вытянуть нить.
7. Нижний ряд. Ввести иглу в первую, ранее один раз прошитую лицевую петлю сверху вниз, вывести через вторую (следующую) лицевую петлю снизу вверх. Вытянуть нить.
8. Верхний ряд. Ввести иглу в первую, ранее один раз прошитую лицевую петлю сверху вниз, вывести через вторую (следующую) переходную петлю снизу вверх. Вытянуть нить.
Повторять пункты 1-8, пока не будут прошиты все петли.


A Kitchener Stitch in a Mirrored Twisted Stitches
Трикотажный шов в зеркальных скрещенных петлях
I also want to demonstrate a Kitchener Stitch in my stitch pattern of mirrored twisted stitches "Mini-Cables." The pattern is one-sided – on the wrong side, the purl stitches are not twisted. I think you can easily adapt this stitch for a regular one-sided twisted stitch rib by combining this chapter with the chapter on grafting a simple 1x1 rib.
1. The top row. Insert the needle from left to right behind both legs of the first twisted stitch of two. Pull the yarn.
2. The bottom row. Insert the needle into the first, previously grafted once twisted stitch from top to bottom, and through the second (next) twisted stitch from the bottom up. Both grafted stitches remain twisted.
3. The top row. Insert the needle from left to right behind both legs of the second twisted stitch. Pull the yarn.
4-5. Bottom row. Insert the needle into the first, previously grafted once stitch from top to bottom from under the left leg of a newly created twisted stitch and pull through the second (next) purl stitch from top to bottom.
6. The top row. Insert the needle into the first, previously grafted once transition stitch from the bottom up and through the second (next) transition stitch from top to bottom. Both grafted legs here belong to the purl stitch of the top row, and the stitch here creates the purl stitch. Pull the yarn.
7. The bottom row. Insert the needle into the first, previously grafted once purl stitch from the bottom up and pull through the second (next) twisted stitch from the bottom up. The second grafted stitch remains twisted. Pull the yarn.
Repeat steps 1-8 until you have grafted all the stitches together.
***
Хочу также показать трикотажный шов в моем узоре зеркальных скрещенных петель "Mini-Cables". Узор односторонний – на изнаночной стороне изнаночные петли обычные, нескрещенные. Думаю, этот шов вы легко приспособите для обычной скрещенной односторонней резинки, объединив этот раздел с разделом о сшивании резинки 1х1.
1. Верхний ряд. Ввести иглу слева направо за обе стенки первой скрещенной петли из двух. Вытянуть нить.
2. Нижний ряд. Ввести иглу в первую, ранее один раз прошитую скрещенную петлю сверху вниз, вывести через вторую (следующую) скрещенную петлю снизу вверх. Обе прошиваемые петли остаются скрещенными.
3. Верхний ряд. Ввести иглу слева направо за обе стенки второй скрещенной петли. Вытянуть нить.
4-5. Нижний ряд. Ввести иглу в первую, ранее один раз прошитую петлю сверху вниз из под только что проложенной нити (левая стенка новой скрещенной петли), вывести через вторую (следующую) изнаночную петлю сверху вниз.
6. Верхний ряд. Ввести иглу в первую, ранее один раз прошитую переходную петлю снизу вверх, вывести через вторую (следующую) переходную петлю сверху вниз. Обе прошитые стенки здесь принадлежат изнаночной петле верхнего ряда, а стежок формирует изнаночную петлю. Вытянуть нить.
7. Нижний ряд. Ввести иглу в первую, ранее один раз прошитую изнаночную петлю снизу вверх, вывести через вторую (следующую) скрещенную петлю снизу вверх. Вторая прошиваемая петля остается скрещенной. Вытянуть нить.
Повторять пункты 1-8, пока не будут прошиты все петли.


A Kitchener Stitch in a Counter Knitting
Трикотажный шов во встречном вязании
Until now, we have been analyzing cases when the knitting of both pieces ran in the same direction: from the bottom up (or top to bottom). A Kitchener Stitch is also possible in counter knitting when knitting from the bottom up meets knitting from top to bottom or knitting from left to right meets the knitting from right to left. I can give you two examples.
1. Еxtensions of the collar joins at the back neck.
2. We knit sideways, where both parts start from the sleeves and meet in the middle of the back.
The Stockinette Stitch, the Garter Stitch, and the reverse Stockinette Stitch here could be grafted according to the same techniques. But there is a catch. The stitches here do not coincide by half the stitch, and as a result, we have a tiny shift. It is impossible to avoid it in any stitch pattern. While in the basic stitch patterns listed above, the shift is noticeable only at the edges, in any other more complex stitch pattern, the shift is far more detectable. It looks like this (see below), although the grafting techniques here remain the same. You need to accept that or choose other joining methods, for instance, the Three Needle Bind Off technique.
***
До сих пор мы разбирали случаи, когда вязание обоих соединяемых полотен шло по одному направлению: снизу вверх (или сверху вниз). Трикотажный шов возможен и во встречном вязании, когда вязание "снизу вверх" соединяется с вязанием "сверху вниз" или вязание "слева направо" встречается с вязанием "справа налево". Могу привести два примера.
1. Продолжение воротника встречается на задней шее.
2. Мы вяжем поперечным вязанием, где обе части начинаются с рукавов и встречаются в середине спинки.
Лицевая гладь, платочная вязка и изнаночная гладь сшивается по тем же принципам. Но есть одна загвоздка. Соединяемые петли здесь не совпадают на половину петли и в итоге мы имеем смещение. Избежать смещения невозможно, и, при любом узоре оно будет. В вышеперечисленных самых простых узорах смещение заметно лишь у краев; в любом другом более сложном узоре смещение заметно и выглядит примерно так (см. ниже), хотя принципы сшивания остаются такими же. С этим нужно свыкнуться или искать другие методы соединения, например, метод трех спиц.


What was the purpose of all this long article? Now you can fix all too long, and too short hand made knitwear, including sleeves, with the length of which we most often get wrong. Now you can fix knitwear of which your children have already grown out and also change stretched out and lose ribs or hems to more dense and elastic ones. We have full closets of such projects in which "something is wrong," – I am sure of this. And no matter what stitch pattern you used there, now you have all the necessary knowledge.
***
Какова была цель всей этой длинной статьи? Сейчас узнаете. Теперь вы сможете починить все слишком длинные и слишком короткие вязаные изделия, включая рукава, с длиной которых мы чаще всего ошибаемся. Починить вещи, из которых ваши дети уже выросли, а также поменять растянувшиеся рыхлые резинки на более плотные и упругие. Таких вязалок у нас, в которых "что то не так", есть полные шкафы – я в этом уверена. И неважно, какой узор был использован – теперь у вас есть все нужные знания.


@Victoria Абсолютно ничего не видно. Волшебство!!!
Айсте, большое спасибо за ваш урок.
Благодаря ему, освоила трикотажный шов на аранах. Связала коллеге небольшой подарок к Новому году - повязку на голову. Когда вязала, подумала, почему бы не сделать её без шва? С первого раза, конечно, не вышло, но с третьего освоила😊 На фото шов выделила зеленой спицей для аранов. Так рада, что получилось. Спасибо!🤗🤗🤗
Это настоящая энциклопедия! Я даже не могу выразить словами своё восхищение, но поверьте, оно огромно! И главное - так вовремя! Растянувшиеся рукава любимого джемпера всю весну не давали покоя, хотела перевязывать, теперь попробую один из способов в этой статье (лицевая гладь)!
Айсте, огромное спасибо за новые знания! А я-то думала, что знаю про трикотажный шов все...:)) а тут и убавления, и прибавления, и даже накиды, да еще и сшивание скрещенной резинки - и все это в красивых и понятных фото! Класс!
Айсте, спасибо большое за эту очень ценную информацию, так красиво и доступно поданную! Как говорила героиня одного хорошего фильма:"Нет ничего невозможного для человека с интеллектом"☺🌹🌹🌹